Maintenance & Warranty
Quality Assurance Plaque
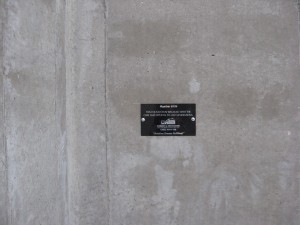
Each and every foundation poured by Coello & Associates receives a serial numbered plaque. The serial number is a very integral part of our quality control process. During excavation, each site is inspected and photographed. Our foundation experts then determine if any adjustments must be made as a result of the site conditions. Pictures are also taken during the construction process, during which a quality control expert examines each foundation to ensure it meets our standards. These pictures, along with all other job related information, are all digitally catalogued by serial number.
Cataloging each job is especially beneficial in the following situations:
- If there is a problem with the foundation.
- If the homeowner has decided to renovate the home.
- If the building inspector has a question now or in the future.
If the buyer’s home inspector has an issue with the foundation at the time of resale.
In addition to the serial number, our plaques contain our contact information. We’re proud of our work, and want our customers to be able to reach us if they should need to. Just as a painter signs each canvas, we put our name on our work of art!
Foundation Warranty Flatwork Warranty
Extended foundation warranties are available with the option of adding Tuff-N-Dri Waterproofing. These warranties are transferable for a small fee and are performance based.
If you feel you have a warranty issue, we recommend that you contact your builder first. If you are not satisfied with the information provided to you by your builder, please contact our office at 262-650-1300. If possible, please have the serial number from the Quality Assurance Plaque in your basement available when you call.
Coello & Associates abides by the standards set forth by the Metropolitan Builders Association Masonry & Concrete Standard.
Maintenance Tips
Here are some tips to help you get the most out of your concrete basement and flatwork.
- Seal your garage floors. Your vehicles pick up salt and other chemicals during the winter months. Salt and other de-icing chemicals will wreak havoc on your concrete if left unprotected.
- Keep your garage floors clean. As noted above, salt and other chemicals can lead to damaged concrete. Don’t let these damaging substances sit on your concrete for extended periods of time.
- Run a dehumidifier in your basement. Even if you don’t have a moisture problem, a dehumidifier is a smart choice for all basements.
- Make sure your sump pump works. Every 6 months, pull up on the float and make sure it runs. Be sure that the discharge from the sump is sending water away from the house. There does not need to be water in the crock in order for the sump pump to run.
- Put a cover on your window wells. Basement windows are much more prone to leakage than above grade windows. Covers are your best defense. Well covers can be purchased at most home improvement stores. We also offer egress well covers.
- Clean your windows. Most basement windows have a weep hole system at the bottom of the window to drain water. Make sure to keep the bottom tracks clean and pay close attention to the visible holes or openings. These must be kept clear of debris in order for the system to drain water properly.
- Keep your window wells free of debris. For the wells to properly drain water, they should be filled with stone on the inside of the well. This stone should be at least 2″ down from the window sill and must be free of debris and silt.
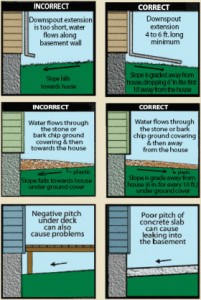
- Maintain your downspouts. These must be connected and the water should flow away from your house. Improperly maintained downspouts can cause water to pool next to the foundation wall causing water to enter your basement.
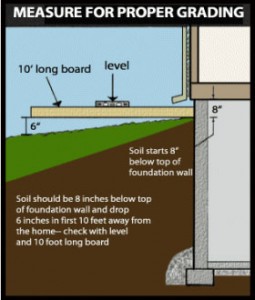
- Keep a close eye on your exterior grade level. To keep your basement dry, keep soils 8″ down from the top of your foundation wall and make sure the grade slopes away from your home. Follow these same guidelines for patios poured up against your house.
Concrete Sealing & De-Icing Chemical Damage
It is important to maintain outdoor concrete slabs and garages. In northern climates, the chemicals used to maintain the roadways in winter will destroy your concrete surface. When salt is used to de-ice concrete slabs, the salt itself does not cause damage to concrete. However, using the salt will increase the frequency of freeze-thaw occurring at the top of slab. If water penetrates the surface of the slab and freezes, the expanding water will cause damage to the surface of the concrete. Beyond salt, many municipalities are using much harsher chemicals for de-icing. These chemicals can actually lead to the deterioration and damage of your concrete slabs. A good concrete sealer will not only help protect the concrete surface from chemicals and freeze-thaw damage, it will also give the slab resistance to oil, paint, and other substances that may be spilled.
We suggest purchasing professional grade sealers directly from an area concrete supplier or from a retailer that caters to true construction professionals. A good standard sealer will typically need to be reapplied every two years, while some sealers may come with warranties of up to ten years with just one application. To determine when sealer should be reapplied, pour water onto the concrete. If the water does not bead, it is time for the sealer to be reapplied.
The two areas most susceptible to damage are where cars park inside your garage and along the garage door. During winter, chemicals become trapped to the snow on your car. As the snow melts, the chemicals penetrate the concrete below your car. The area along the garage door also becomes susceptible to damage because melted snow will run towards the door and because the temperatures at the door threshold may drop below freezing.
Sealer can be applied with either a sprayer or a roller. The key is to apply an even coat without allowing the sealer to puddle on the concrete. It is important that the sealer be applied when the temperature is at least 40 degrees (Fahrenheit), and it should remain above this temperature for several hours after application. A solvent may be required to clean your sprayer, roller, and even yourself.
Please do keep in mind that if you plan to apply an epoxy coating over your garage floor, sealing is not recommended. Likewise, if you have plans to paint your floors, it is advised to check for sealer compatibility with the selected paint.
In addition to your garage floor, we do advise regular sealing of concrete driveways, walkways, patios, and entry stoops. Sealing your basement floor is not necessary, but may be desired to minimize dust and protect the floor from stains. If you do choose to seal the basement floor, please be aware of the danger of accumulating fumes from the sealer.
Concrete Cracking
While concrete is an excellent building material, it will inevitably crack over time. It is known that for every 100 lineal feet of concrete wall or floor, there will be cracks with a cumulative width of at least 5/8 inch. This is due to the chemical process known as hydration, which takes place when the concrete transforms from a liquid to a solid. The cracks formed during this metamorphosis are called shrinkage cracks.
Your foundation and floors are engineered with the shrinkage cracks in mind. The concrete mix used is designed to use the least amount of water needed, which will cut down on the amount of shrinkage cracks. This is made possible through the use of admixtures and water reducers. In both your foundation and floors, control joints are utilized to help control the cracks. In conjunction with the control joints in your foundation, a metal or hard plastic waterstop is placed behind the control joint to prevent water from permeating through the cracks and into your basement. The steel reinforcement used in our foundations also helps to reduce shrinkage cracks.
While several steps are taken to reduce the shrinkage cracks, it is likely that some cracks will still occur outside of the control joints. These cracks are not likely to affect the structural integrity of the concrete and are much less likely to occur after the first year.
Download the Crack Comparator Here
Cracks that may require repair have the following characteristics:
• The crack is on average 3/16 inch wide or larger, is outside of a control joint, and leaks water into the basement on a home that has its final grading completed.
Repairing these cracks should be easy, and will likely be done from the inside of your foundation.
General Maintenance for Concrete Floors
To ensure the cleanliness of your concrete surfaces, give them a yearly wash. Mix some mild-strength cleaning solution with water in a mop bucket. NOTE: DO NOT use ammonia, bleach or highly acidic substances on polished or stamped floors, as that will damage the concrete. Some good cleaners include liquid dish detergent, Castile cleaning solutions, and stone cleaners. Check general use floor cleaner instructions before use, as some may not be suitable for concrete floors.
Mold and Mud on Standard Concrete Surfaces
The first step in mud stain removal for any concrete surface is to scoop up any physical mud off the surface you wish to clean, either with paper towels or a wet wipe. After removing as much mud as you can, clean your surface of other substances, such as dirt and dust. Afterwards, sweep the surface. If you spot any mold, do not sweep it up as that may cause the mold to spread. Instead, apply a mold-killing chemical, such as bleach or a specialty brand mold removing substance. Always test the cleaning agent on a small section of your flooring first to make sure it doesn’t cause any unwanted discoloration. Scrub your sprayed area with a nylon brush, rinse with water, and let the area dry completely before assessing whether you need to repeat the process. Continue until all the mold is gone.
After cleansing the mold from your concrete surface, it’s safe to rid your concrete of debris and dirt. You can do this with common household appliances, such as brooms or vacuums. A thorough sweep is crucial for mopping preparation, as it can prevent you from spreading unwanted substances via your mop.
Upon ridding your floors of debris and dirt, it’s finally time to turn your attention toward erasing your mud stains. One of the cheapest and most convenient concrete cleaners for removing mud stains is a mixture of water and liquid laundry detergent. Apply this solution onto the stain, covering it completely. Scrub the mixture into the stain with a nylon brush. Afterwards, rinse the area with water and let the area dry. After the area is completely dry, make sure that the stain is gone. If it has not left your concrete surface, repeat this process. You may wish to use a new concoction, substituting the detergent with white vinegar or baking soda. Baking soda and vinegar solutions are also effective for treating rust that has accumulated in your floor. You may apply these stain-removal techniques towards rust removal.
Grease Stains on Standard Concrete Surfaces
For grease stains, you may not need to look any further than under the kitchen counter. Grease fighting dish soaps can be used to clean grease stains from concrete. Cover the stain with liquid soap and give it a good scrub with a stiff bristled brush. You may need to rinse and repeat, but this is an effective method of removing these stains.
Powdered dish and laundry soaps can also be used with water and a scrub brush to remove grease stains.
If these soaps do not work, shaking on some baking soda with water and further scrubbing may do the trick.
For tougher stains, a diluted solution of TSP (trisodium phosphate) can be applied similarly to the cleaners above, but take extra care to wash off residue. Due to toxicity concerns, be sure to wear rubber gloves and have proper ventilation if proceeding with this chemical choice.
Pressure Washing
Of course, you may want to start by pressure washing, but not all individuals have one on hand. If other methods have been unsuccessful, pressure/power washing your slabs is a great option and these machines can be rented for those not looking to own.
Follow the manufacturer’s instructions, as misuse can lead to damages to your home or even self-harm. Pressure washers are mostly used for outdoor settings, as these machines are high-powered and will most likely soak something that you do not wish to get liquids on, like wood surfaces or appliances. If you do need to use a pressure washer indoors, be sure to shop carefully and find one that’s built for indoor use. Generally, gas-powered pressure washers are too powerful for indoor use, so steer clear of those when looking for an indoor pressure washer.


